
Dometic Air Distribution Box: Manual Control for RV AC
Share
Dometic Air Distribution Box: Complete Installation & Operation Guide
1. Introduction: Why Choose the Dometic Air Distribution Box?
When it comes to reliable climate control in recreational vehicles, few names carry the reputation and track record of Dometic. For decades, RV owners have trusted Dometic products to deliver consistent performance even under the harshest conditions—from scorching desert heat to humid coastal environments. The Dometic Air Distribution Box stands as a cornerstone component in this legacy, providing efficient air distribution that transforms your RV into a comfortable mobile sanctuary.
Market Leadership and User Confidence
Dometic's Universal Air Distribution Box has earned its reputation as a perfect solution for RV air conditioning needs, specifically designed for non-ducted Dometic Brisk Air II and Penguin air conditioning systems. The overwhelming positive feedback from thousands of RV owners reflects the product's reliability—users consistently praise its straightforward installation process, intuitive operation, and durability across years of constant travel and vibration.
Critical Role in Non-Ducted Air Conditioning Systems
Understanding the Dometic Air Distribution Box's importance requires recognizing its fundamental function within your RV's climate control architecture. The Air Distribution Box (ADB) serves as a vital component in an RV's air conditioning system, mounting to the ceiling directly under the roof top air conditioner and providing a divider for the interior's intake and discharge. This strategic positioning enables the unit to effectively distribute conditioned air throughout your living space while simultaneously drawing return air for continuous circulation.
For those operating non-ducted air conditioning systems—where cooled air blows directly into the cabin rather than through hidden ductwork—the air distribution box becomes even more critical. In non-ducted systems, cooled air is blown directly into the cabin through an air distribution box mounted in the ceiling, with no hidden ductwork behind walls or ceiling. This simpler configuration offers substantial advantages for smaller RVs and those seeking cost-effective, straightforward climate control solutions.
The manual control air distribution box eliminates the need for complex wall-mounted thermostats and their associated wiring, placing all operational controls at your fingertips on the unit itself. This hands-on approach appeals to RV owners who appreciate direct, intuitive control over their environment without relying on electronic systems that may fail or require troubleshooting in remote locations.
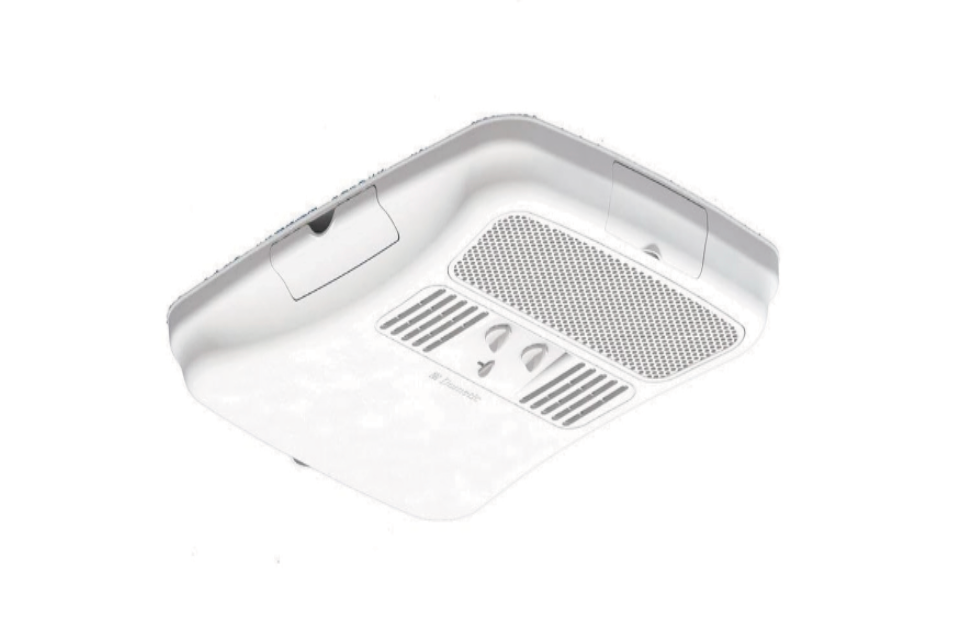
2. Product Overview & Specifications
Model Information and Physical Dimensions
The Dometic Universal Air Distribution Box model 3314851.000 (item number 9105304487) features a low-profile design measuring 23.11 inches in depth, 21.15 inches in width, and just 4.25 inches in height. This compact footprint proves crucial for RVs with limited ceiling clearance or where headroom matters—particularly in slide-outs, over dining areas, or in bathroom spaces where every inch of vertical clearance enhances livability.
The unit weighs approximately 9.92 pounds, making it manageable for single-person installation while remaining substantial enough to feel solidly constructed. The white finish integrates seamlessly with standard RV interiors, providing a clean, professional appearance that doesn't draw unnecessary attention or clash with existing décor.
Compatible Systems and Application
This Air Distribution Box is designed specifically for newer Dometic RV rooftop air conditioners such as the Brisk II, Penguin II, and the Blizzard NXT Series in non-ducted applications. The "Universal" designation indicates compatibility across multiple Dometic air conditioner models, simplifying the replacement process and providing upgrade paths for owners of various RV configurations.
This ADB offers controls directly on the unit, allowing you to control the air conditioner without routing a communication wire to a wall mounted thermostat. This design philosophy reduces complexity, eliminates potential wiring failures, and places control authority exactly where you want it—immediately accessible without crossing the RV to adjust settings.
Manual Control Features
Conveniently placed operation and control knobs on the horizontal surface ensure easy access for operation. The rotary dial interface provides tactile feedback that works reliably regardless of temperature extremes, unlike touchscreens or digital interfaces that may become sluggish in cold conditions or problematic when exposed to direct sunlight.
The manual controls typically include separate adjustment for temperature setting and fan speed, allowing independent control of these critical parameters. This separation enables you to maintain consistent cooling while adjusting air velocity to match your comfort preferences—higher fan speeds for rapid cooling or quieter operation for sleeping hours.
Installation Requirements
The ADB connects to the air conditioner with four bolts, sealing the A/C to the roof. This straightforward mounting system requires only basic tools and can be accomplished by reasonably handy RV owners, though professional installation remains advisable for those uncomfortable working with electrical systems or accessing rooftops.
If roof thickness exceeds 4 inches, the Dometic Bolt Kit must be purchased separately. Standard RV roof construction typically falls within the 2-4 inch range, but owners of custom builds or units with additional insulation packages should verify their specifications before ordering to ensure proper fitment.
Included Components
The scope of delivery includes the ADB unit itself, an installation and operating manual, and installation materials. While the included hardware covers basic mounting requirements, experienced installers often recommend having additional sealant and gasket material on hand to ensure weathertight installation—particularly important for preventing water intrusion that could damage interior finishes or electrical systems.
3. RV Air Conditioning Installation: Step-by-Step Process
Pre-Installation Preparation and Assessment
Successful installation begins long before tools meet metal. Start by thoroughly documenting your existing air conditioning system through photographs from multiple angles—these images prove invaluable if questions arise during installation or if you need to reference original configurations later.
Verifying Compatibility and Measurements
Measure your existing roof opening carefully. Most standard RV air conditioner installations utilize a 14-inch by 14-inch roof opening, which the Dometic Universal Air Distribution Box accommodates perfectly. However, verify both your roof opening dimensions and ceiling thickness before ordering to avoid costly returns or installation delays.
Check your ceiling cavity depth—the vertical space between your RV's interior ceiling and the roof deck. Adequate clearance ensures the air distribution box fits properly without interfering with roof structure, insulation, or existing wiring. Insufficient clearance may require modification of ceiling panels or selection of an alternative low-profile unit.
Power System Verification
Before beginning any RV air conditioning installation work, confirm your electrical system's specifications. The system requires a 115V power supply with either a 15-amp or 20-amp time delay fuse or circuit breaker. Verify that your RV's electrical panel provides adequate capacity and that the dedicated air conditioner circuit meets this requirement.
Required Tools and Materials
Assemble all necessary equipment before starting installation to avoid interruptions mid-project:
Essential Tools:
- Phillips and flathead screwdrivers (multiple sizes)
- Power drill with assorted bits
- Socket wrench set
- Wire strippers and cutters
- Voltage tester or multimeter
- Ladder or step stool for safe roof access
- Utility knife
- Caulk gun
Additional Materials:
- High-quality RV sealant (Dicor or equivalent)
- Electrical tape
- Wire nuts or terminal connectors
- Foam insulation tape
- Cleaning supplies (rubbing alcohol, clean rags)
- Personal protective equipment (gloves, safety glasses)
Removing the Existing Air Distribution Box
Safety must be the absolute first priority—ensure your RV is completely powered down by disconnecting the battery, unplugging shore power, and turning off any generators. Use a voltage tester to verify no electrical current flows through the air conditioner circuit before proceeding with any work.
Interior Removal Steps
Begin inside your RV where you'll perform most of the work in comfortable conditions. Remove the grille or cover from your existing air distribution box by locating and removing securing screws—these may hide beneath decorative caps or behind filter access panels.
Disconnect the electrical connections between the RV's wiring and the old air conditioner, taking careful note of wire colors and their terminal positions. Photograph these connections or create a detailed diagram before disconnecting anything. Many installations use standardized color coding, but custom wiring may deviate from conventions.
Remove mounting screws securing the air distribution box to the ceiling. Support the unit as you remove the final fasteners to prevent it from falling—even lightweight components can cause injury or damage if dropped unexpectedly. Lower the old unit carefully, watching for any remaining wires or connections you may have overlooked.
Accessing the Rooftop Unit
From the roof, loosen the mounting bolts and push the old AC unit upward through the roof opening—you might need to give it a gentle nudge to break the seal between the unit and the roof. Years of sealant and gasket compression create significant adhesion that requires patient, consistent pressure rather than forceful impacts that could damage surrounding roof material.
Installing the New Dometic Air Distribution Box
Roof-Level Installation
Attach the gasket and sponge with sealing strip to the designated locations on the outdoor unit chassis, then lift the unit to the rooftop and align it horizontally with the opening. The new gasket should sit flush against the roof surface, creating a weatherproof seal that prevents water intrusion—a critical consideration given the constant exposure to rain, snow, and road spray.
Line up the new air conditioner with the existing opening, ensuring the gasket on the bottom of the unit sits right over the roof opening to help prevent leaks. Take time to center the unit precisely before securing—misalignment causes uneven gasket compression, potentially creating leak paths that manifest only during heavy rain when diagnosis becomes difficult.
Interior Assembly and Connection
Return inside the RV to attach the mounting frame that holds the AC unit in place, first dry-fitting the frame to ensure snug fitment. This preliminary check identifies potential interference issues before you commit to permanent installation.
Measure the gap between the roof and the air distribution box, and if necessary, cut the foam divider that came with your AC to fit this space precisely. The foam divider serves multiple purposes: thermal insulation, acoustic dampening, and structural support that prevents vibration transmission to interior ceiling panels.
With foam properly positioned, secure the mounting frame using provided hardware. Tighten fasteners progressively in a cross-pattern rather than fully tightening one location before moving to the next—this technique ensures even pressure distribution and prevents warping of mounting surfaces.
Electrical Connections
Wire the system according to manufacturer specifications and your documented original configuration. Route the power cord into the junction box and reconnect control signal wires to the display box. Ensure all connections achieve proper tension—loose terminals create resistance that generates heat, potentially causing connection failure or fire hazards.
Use appropriate wire nuts or terminal connectors rated for the current load. Wrap connections with electrical tape to provide additional insulation and strain relief. Route wiring to avoid sharp edges or pinch points where vibration could eventually wear through insulation.
Sealing and Weatherproofing
Apply sealant generously around the roof penetration, focusing on areas where the gasket meets the roof surface and around mounting hardware. Use high-quality RV-specific sealant that remains flexible across temperature extremes—some household caulks become brittle in cold weather or run excessively when hot.
Create a complete seal without gaps or voids where water could penetrate. Many experienced installers apply sealant in multiple passes: an initial layer that fills major gaps, followed by a finish coat that creates smooth, professional-looking weatherproofing.
Final Assembly and Testing
Secure the grille with four screws, ensuring the control panel faces the front of the RV for logical access. Install any filters according to manufacturer instructions—proper filter installation ensures adequate airflow while protecting internal components from dust and debris.
Test your new RV air conditioner by restoring power and activating the AC using the control panel on the ADB, testing different modes like cool, fan, and dry while adjusting temperature to verify proper operation. Allow the system to run through a complete cooling cycle, monitoring for unusual sounds, vibrations, or performance issues.
Check for proper airflow from discharge vents and adequate return air through intake grilles. Verify that controls respond appropriately to adjustments and that the unit cycles on and off correctly based on temperature settings.
4. Operation and Maintenance Guide
Understanding the Manual Control Interface
The Dometic Air Distribution Box features intuitive rotary controls that provide direct manipulation of air conditioning functions without electronic intermediaries. This mechanical control system offers significant advantages in terms of reliability, ease of repair, and functionality in extreme conditions where electronic systems might fail.
Temperature Control Operation
The temperature adjustment dial typically features a range from maximum cooling to minimum cooling settings. Unlike digital thermostats that maintain specific temperatures, these analog controls work proportionally—turning the dial toward the cooler setting increases cooling intensity until reaching maximum compressor output.
Finding your optimal comfort setting requires brief experimentation. Start with moderate settings and adjust incrementally until achieving desired interior temperature. Once identified, note the dial position for future reference—many users mark preferred settings with small stickers or nail polish for quick adjustment.
Fan Speed Control
Independent fan speed control allows you to balance cooling performance against noise levels and energy consumption. Higher fan speeds deliver more aggressive air circulation, accelerating cooling when you first enter a hot RV. Lower speeds provide quieter operation ideal for sleeping hours while maintaining adequate air movement for comfort.
Most units offer three or four distinct fan speeds: low, medium, high, and sometimes an automatic setting that adjusts based on cooling demand. Experiment with each to understand how they affect both cooling performance and acoustic characteristics in your specific RV layout.
Routine Maintenance Requirements
Proper maintenance extends equipment life while ensuring optimal performance throughout your travels. Establish regular maintenance routines that become automatic habits—consistency matters more than perfection.
Filter Maintenance
The system is equipped with a return air filter ensuring you enjoy comfortable, clean, and well-ventilated environment while on the road. Access filters by removing the grille or designated filter access panel—most designs allow tool-free removal for convenience.
Inspect filters monthly during regular use or more frequently in dusty environments like desert camping or dirt road travel. Clean washable filters using warm water and mild detergent, allowing complete drying before reinstallation. Replace disposable filters when cleaning no longer restores adequate airflow or when physical damage occurs.
Clogged filters dramatically reduce system efficiency by restricting airflow. This restriction forces the compressor to work harder, increases energy consumption, and can lead to premature component failure. In severe cases, restricted airflow causes evaporator coils to ice over, completely blocking air circulation.
Visual Inspections
Conduct monthly visual inspections of both interior and exterior components. Inside, check for condensation around the unit that might indicate seal failure or drainage problems. Examine electrical connections for signs of corrosion, looseness, or overheating evidenced by discolored insulation or burnt odors.
On the roof, inspect sealant condition regularly—especially after severe weather, when traveling rough roads, or when the RV experiences significant flexing. Look for cracks, separation, or areas where sealant has pulled away from surfaces. Address any weatherproofing concerns immediately before water intrusion causes expensive damage.
Seasonal Preparation
Before extended storage periods, run the air conditioner for 30 minutes to ensure refrigerant circulates throughout the system, preventing oil separation. Clean filters thoroughly and consider leaving them removed during storage to promote air circulation that inhibits mold growth.
For winter storage in freezing climates, ensure complete drainage of any condensate that might freeze and damage components. Some users install RV covers or shrouds specifically over rooftop air conditioners to protect against snow accumulation and ice formation.
Troubleshooting Common Issues
Insufficient Cooling or Weak Airflow
When your system fails to cool adequately, begin with the simplest explanations. Verify that temperature and fan controls are set appropriately—surprisingly often, performance complaints trace to control positions accidentally changed during cleaning or by passengers.
Check filters for blockage that restricts airflow. Inspect supply and return vents to ensure nothing obstructs air paths—objects placed too close to vents frequently cause mysterious performance degradation. Verify that all registers are fully open and that adjustable louvers haven't been accidentally closed.
If basic checks reveal no obvious issues, examine the exterior condenser coils for debris accumulation. Leaves, cottonwood seeds, and dirt buildup on condenser fins drastically reduce heat rejection efficiency. Clean carefully using low-pressure water spray or soft brushes—avoid high-pressure washing that bends delicate fins.
Excessive Noise or Vibration
Some operational noise is normal, but loud rattling, grinding, or buzzing indicates problems requiring attention. Loose mounting hardware frequently causes vibration—systematically check and tighten all mounting screws both inside and on the roof.
Debris in the blower wheel creates distinctive rattling sounds. Access the blower compartment if possible and inspect for leaves, insects, or other foreign material. Even small objects produce disproportionate noise when struck repeatedly by spinning fan blades.
Bearing wear in fan motors generates grinding or squealing sounds that worsen over time. This condition requires professional service or motor replacement—continuing operation with worn bearings risks complete motor failure and potentially more extensive damage.
Water Leaks
Water appearing around the air distribution box may originate from failed roof seals allowing external water intrusion, or from condensate drainage problems. Differentiate between these causes by noting when leaks occur—after rain suggests external seal failure, while leaks during cooling operation indicate internal drainage issues.
Inspect roof sealant as described in maintenance sections. For internal drainage problems, verify that condensate drain holes remain clear and that drain lines (if equipped) haven't become blocked or disconnected. Clean drain systems using compressed air or flexible wire, being careful not to damage drain pan surfaces.
5. Frequently Asked Questions (FAQ)
Q1: Is the Dometic Air Distribution Box compatible with all RV air conditioners?
The Universal Air Distribution Box is designed specifically for newer Dometic RV rooftop air conditioners such as the Brisk II, Penguin II, and the Blizzard NXT Series. While "Universal" suggests broad compatibility, this designation applies specifically to Dometic's product line in non-ducted configurations.
Before purchasing, verify your existing air conditioner's brand, model, and ducting configuration. Dometic's website and customer service can confirm compatibility with your specific system. Installing incompatible components risks poor performance, improper fitment, and potentially voiding warranties on both the air conditioner and air distribution box.
Other manufacturers' air conditioners—including Coleman-Mach, Airxcel, Advent, and Furrion—typically require brand-specific air distribution boxes designed for their unique mounting systems and electrical interfaces. Attempting to mix brands usually results in mounting incompatibilities, electrical mismatches, or control system failures.
Q2: Do I need a professional electrician for installation?
RV air conditioning installation complexity falls somewhere between simple appliance replacement and whole-house HVAC work. Success depends on your mechanical aptitude, electrical knowledge, and comfort working at heights on an RV roof.
If you possess basic electrical understanding—can identify and safely work with 120-volt circuits, understand grounding principles, and confidently use voltage testers—and feel comfortable with basic hand tools, self-installation becomes feasible. The manual control air distribution box simplifies electrical work by eliminating complex thermostat wiring that challenges many DIY installers.
However, if you lack confidence in any of these areas, professional installation proves worthwhile. Electrical mistakes create fire hazards, while improper roof sealing leads to expensive water damage. Professional installers typically complete the job in 2-4 hours, achieving results backed by workmanship warranties that provide peace of mind.
Consider hybrid approaches: hire a mobile RV technician to supervise your work, providing guidance while you handle the physical labor. This arrangement reduces labor costs while ensuring critical steps receive expert oversight.
Q3: How can I extend my air distribution box's service life?
Longevity stems from consistent preventive maintenance rather than occasional intensive attention. Establish monthly routines during travel season:
Clean or replace filters religiously. This single action prevents 80% of air conditioner problems while maximizing energy efficiency. Set calendar reminders if necessary—filter maintenance deserves the same priority as engine oil changes.
Inspect and maintain roof sealing annually or after any incidents that might compromise weatherproofing. Addressing small seal failures costs minimal time and money, while ignoring them leads to catastrophic water damage requiring thousands in repairs.
Avoid continuous maximum-setting operation. Running your air conditioner at full capacity 24/7 accelerates wear on compressors, fans, and controls. When practical, use moderate settings that cycle the compressor on and off—this intermittent operation extends component life substantially.
Protect the unit from unnecessary stress. When parked, position your RV to take advantage of natural shade—this simple action can reduce cooling load by 30-40%. Close window coverings during peak sun hours. Use vent fans to exhaust heat buildup before relying solely on air conditioning.
Q4: Can I upgrade from a thermostat-controlled system to this manual control unit?
Yes, this transition is entirely feasible and often desirable. Manual control air distribution boxes eliminate complexity, reduce potential failure points, and provide straightforward operation that many RVers prefer. The conversion requires disconnecting and removing wall thermostat wiring, then installing the manual control ADB using standard procedures.
However, consider carefully whether this represents an upgrade for your specific usage. Thermostat-controlled systems offer precision temperature maintenance and can integrate with smart home technology for remote monitoring and control. If you appreciate set-and-forget operation or want programmable features, thermostatic control provides advantages worth its added complexity.
Manual controls excel for RVers who actively manage their environment, prefer tactile interfaces, or value simplicity and reliability over automation. They're particularly appealing for boondocking where minimizing parasitic electrical draw matters—manual systems consume no standby power when the air conditioner isn't running.
Q5: What should I do if I experience reduced cooling performance?
Systematically eliminate possibilities starting with simplest explanations:
First, verify basic operational settings. Confirm temperature and fan controls are properly positioned, power supply remains stable, and circuit breakers haven't tripped. Surprisingly often, mysterious performance problems trace to accidentally changed settings or temporary power fluctuations.
Second, inspect and clean filters immediately. Restricted airflow from clogged filters is the single most common cause of performance complaints. Clean or replace filters, then test the system for at least 30 minutes before pursuing additional diagnostics.
Third, examine the exterior condenser unit for debris accumulation. Clean condenser fins carefully, ensuring unrestricted airflow around the rooftop unit. Verify nothing blocks either supply or return vents inside the RV.
If these simple checks fail to restore performance, refrigerant loss becomes the likely culprit. Refrigerant issues require professional service—while DIY refrigerant charging is technically possible, it requires specialized equipment, proper training, and legal compliance with environmental regulations. Contact a certified RV service center for refrigerant system diagnostics and repair.
Q6: How does non-ducted air conditioning compare to ducted systems?
Non-ducted systems blow cooled air directly into the cabin through an air distribution box mounted in the ceiling, with no hidden ductwork behind walls or ceiling, while ducted systems channel cool air through a hidden network of ducts with vents in multiple locations.
Non-ducted air conditioning offers several compelling advantages. Installation costs substantially less—no ductwork to fabricate, install, or seal. Maintenance is simpler with fewer components and access points. The direct airflow provides powerful cooling in the immediate area beneath the unit. And troubleshooting becomes straightforward with all functional components readily accessible.
However, ducted systems excel in larger RVs where even air distribution matters. They provide quieter operation by dissipating air movement across multiple vents rather than concentrating it in one location. Temperature uniformity improves throughout the coach, eliminating the dramatic temperature gradients common with single-point air delivery.
For RVs under 25-30 feet with open floor plans, non-ducted systems typically prove ideal. Longer units or those with separate bedroom spaces often benefit from ducted distribution that ensures comfortable sleeping areas despite their distance from the main living space.
6. Conclusion and Recommendations
The Dometic Air Distribution Box exemplifies thoughtful engineering focused on delivering reliable performance where it matters most—keeping you comfortable during your adventures regardless of external conditions. Its robust construction, intuitive controls, and straightforward installation make it an excellent choice for RV owners seeking dependable climate control without unnecessary complexity.
Key Advantages Summarized
High-efficiency operation ensures maximum cooling from your rooftop air conditioner unit without wasting energy. The low-profile design preserves precious interior headroom while the white finish integrates seamlessly with standard RV interiors. Manual controls provide direct, tactile operation that works reliably regardless of electronic system status or battery voltage levels.
Wide compatibility across Dometic's product line simplifies replacement and upgrade paths. Whether you own a Brisk II, Penguin II, or Blizzard NXT air conditioner, this universal air distribution box provides proper fitment and full functionality. The straightforward installation process—though requiring basic mechanical and electrical skills—places successful DIY installation within reach of motivated RV owners.
Strong adaptability makes the system suitable for various RV types and sizes. From compact travel trailers to larger fifth wheels operating in non-ducted configurations, the Dometic Air Distribution Box delivers consistent performance. Its manual control interface appeals particularly to boondockers and dry campers who appreciate systems that don't demand continuous electrical power for operation.
Making the Right Choice for Your RV
Select your air distribution box based on your specific RV configuration, existing air conditioner model, and personal preferences regarding control interfaces. Verify compatibility before ordering to ensure proper fitment—measure your roof opening, check ceiling thickness, and confirm your air conditioner model matches Dometic's compatibility specifications.
Consider your technical comfort level honestly when deciding between DIY installation and professional service. While the manual control air distribution box simplifies electrical work compared to thermostat-based systems, successful installation still demands competence with basic wiring, confidence working on rooftops, and attention to weatherproofing details that prevent future problems.
For those upgrading from older systems, the Dometic Universal Air Distribution Box often represents an opportunity to modernize climate control while simultaneously simplifying operations. The elimination of aging thermostats and complex control wiring reduces potential failure points while improving reliability—valuable benefits for those who travel extensively or visit remote areas where service access is limited.
Final Thoughts
Comfortable climate control transforms RV travel from mere camping into genuine mobile living. The Dometic Air Distribution Box provides a critical foundation for this comfort, distributing conditioned air efficiently while offering reliable, straightforward control that works trip after trip, season after season. Whether you're a weekend warrior escaping to nearby campgrounds or a full-time RVer exploring distant horizons, investing in quality climate control components pays dividends in comfort, reliability, and peace of mind throughout your journeys.